The quilt is in the washer as I type. What a wonderful feeling! The blocks came from a challenge that started January 1, 2015. All the blocks were completed be the end of December that year. The idea was to put all the blocks into one quilt. But that was way too busy. So a second centre was pieced and two quilts were made.
The centres of both tops were quilted on my mid arm. And that's where the projects stopped. For over a year. Finally time to experiment. To one top centre, the backing was added to, four strips of bat joined to the centre bat, and then the wide border was stitched on. The borders were pin basted and then free motion quilted using my Janome. Puckers, pleats and stress galore! Lots of ripping out stitches and blue air. Finally that border was quilted. And the top put aside.
Then the second top was pulled out to be worked on. This time the three borders were stitched together for each of the four sides. Then they were quilted on the long arm. The backing trimmed 2" beyond the borders. The borders stitched to the centre. The backing folded over an inch, then hand stitched closed. Just a bit of free motion quilting over the space where the top and quilted borders were joined. Add the binding and the first 365 was completed. Much easier than the first experiment. Little puckering and almost no blue air.
Now to finish the earlier experimental top. Only 2 rows of borders needed to be joined for each side of the quilt. Instead of quilting it under the domestic machine, these were quilted on the frame. A bit of backing fabric was wasted, but this was so much easier. Then add the quilted borders the same as before. So much easier with the borders having been quilted. Plus having had some practice with this method in the previous top probably helped.
Using the quilting suspension system made things so much easier. Both for the free motion under the Janome, and for stitching on the binding.
Here's the second 365 quilt....
Here's the first 365 for comparison....
Similar, but not identical! Here's hoping they survive the washing machine and dryer!
Saturday, February 17, 2018
Friday, February 9, 2018
Sew what's happening in the sewing room?
What's happening? The answer is a lot of seam ripping. Remember this quilt I made for DS's new home?
There was a problem with it. Every time it was washed, the fabric from the squares would pull out from under the sashing. Not sure why, All of the edges were securely stitched. But it happened. Loose weave in the fabric perhaps. Not all the squares had this issue. Just the light blue. So that might be the issue.
Wrestling this huge quilt under the sewing machine to make repairs was a pain. So I bit the bullet and cut the quilt apart. Dug out the seam ripper and spent hours taking it apart. All in an effort to save the Star Trek fabric that is no longer available.
A lot of trimming, starching, pressing and sewing later, here's the new quilt top.
Tomorrow I'll run out to pick up some more batting and I can get this top quilted and give it back to DS.
The first quilt had been done as a quilt as you go. This left me with a lot of batting squares and backing. I'm not one to throw out anything. So what do I do with the left overs?
The answer came yesterday in an email from Angela Walters. She's starting a Free Motion Quilt Along. Quite a few of us from the hearts2hands Yahoo group will be quilting along. This should be fun.
Today was spent preparing for the Quilt Along. My blocks, backing and backing are ready to be put together for the challenge. Can't wait!
Saturday, January 27, 2018
The Oldest Top Is Finally Quilted!
I had a lot of fun making the blocks for this quilt. So I just kept making them. The quilt grew and grew. When I laid it on top of my bed to see how much larger to make
it, I had a shock. It was a king size, plus a generous twin size
already!
Out came the seam ripper and I carefully removed bocks to make the king size top. Then it sat in a project bag. For ages! I was waiting for the opportunity to rent time on a larger long arm. But that didn't look like it was ever going to happen. So I divided the top in half, and did each half on my mid arm.
After the quilting was finished, the two halves were stitched together. I hand stitched the backing closed. Next was to free motion down the centre seam.
Ever try to free motion down the centre of a king size quilt? It's nuts! How do those that do all their quilting on a DSM manage? If there had been more of the backing fabric, I would have tackled the quilting differently.
The top would have been divided into three sections. Quilted using the mid arm and frame. Then sew the first two sections together. Free motion on the seam. Then only 1/3 of the top, bat and backing would have to be forced between the needle and the machine. Instead of a full half! Then repeat for the third section.
At no time would there have been half of the quilt being pushed, shoved, and cursed at while trying to free motion along a joining seam. Oh well. Live and learn. And I can't imagine making another king size quilt any time soon!
The quilt suspension system worked great for putting the binding on. No drag of heavy fabric to pull the edge of the quilt out from under the machine foot. Any problems with the binding is operator error.
And now for the quilt.....the oldest top in my collection is finally on my bed! It's a simple pattern. But keep in mind how many years ago it was made. And I still like it!
Thursday, January 25, 2018
Where to put those bungee cords....
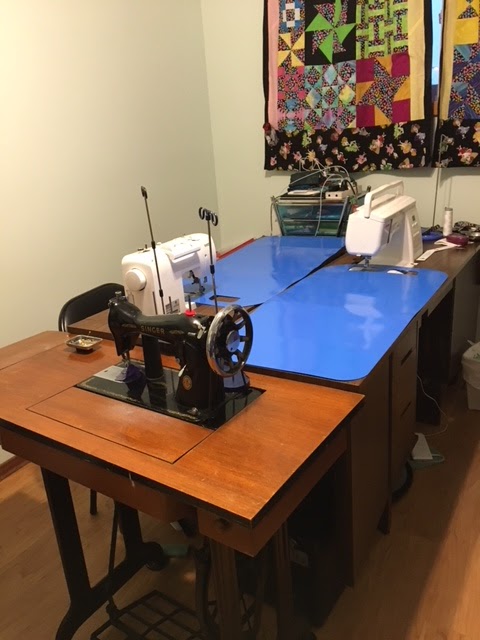
I finally had a chance to test the quilting suspension system. What a great idea to have it between the two sewing tables. Or sew I thought. The tables are narrow, the quilt large. No where for the fabric to land after it comes through the sewing machine.
There was a centre seam in a king size quilt to be stitched. The two halves of the quilt weigh a ton. One of these days I will weigh the quilt. Fabric is heavy! The clamps held the fabric just fine. The sewing machine, my shoulders and hands felt the relief of not having to wrestle all that weight. But the garment rack suspension system was in the wrong place.
Actually, ideally the rack should be in an L shape. Behind and to the left of the sewing machine. That would be ideal for handling the weight. But just behind the machine helps so much. Except for the lack of space on one table.
So the garment rack was pulled out. The machine tables are again butted up to each other, making one large table. The rack can be moved to behind which ever sewing machine is in use. Problem solved!
I'm ready to free motion some leaves down the centre seam, using my Janome. Hopefully that part will be finished tomorrow. Then I'll move the rack to the other side and use the Brother to sew on the binding. I'm sew looking forward to not having the weight of the fabric drag the quilt out from under the sewing machine foot during that job!
Sunday, January 21, 2018
Under suspense?
Adding the binding to my last quilt was a drag. No joking. The weight of the quilt kept pulling the binding edge out from under the sewing machine foot. The binding was finished. But as I mentioned in my previous post, I'm really not happy with how it turned out.
I know there is a solution out there. I've watched enough videos while I was avoiding doing something productive. Sew it's time to re-do the sewing room/quilt studio.
First thing that came to mind was snow carpets from the dollar stores. After a bit of searching I found the video that shows how these carpets are used. The slippery side of the kids sled helps reduce the fabric drag. Cost $3 per snow carpet.
When working on a large quilt, I can place both carpets over the two sewing machine tables that are back to back.
If I have another quilter over for a sewing session, we each can have a carpet on our sewing table.
But there is still a lot of drag when the quilt is really heavy.
Next comes looking for videos on quilting suspension systems. There are quite a few sites that sell these. But I'm cheap. (See above using snow carpets from the dollar store instead of the expensive sliders sold at quilt shops and sewing machine stores)
A DIY quilt suspension search lead to some interesting ideas. The one that did not require putting holes in the walls/ceiling (anyone met my DH?), suggested using a garment trolley. A quick trip to Jysk and $26 CDN later, I have a trolley.
DH came up with the bungee cords and another trip to the dollar store provided 10 clamps for $2.
Now for the real suspense story. Will this work the way I'm hoping it will? Later.....
Friday, January 19, 2018
2015 365 Day Block Challenge - Finished! Well at least half of it is....
January 1, 2015, a number of quilters (myself included) started a quilting adventure. We signed up to receive quilt block instructions every day. And it was a challenge to keep up with these blocks. Life does get in the way!
The blocks were 3 1/2" for the dark fabrics. And 6 1/2" for the lighter value blocks. A lot of different techniques were used. Who knew there are so many ways to make flying geese or half square triangles? And lets not talk about Y seams. Thank you!
When it came time to put the blocks together in a top, I soon realized several things. The top would be too large to go on my mid arm quilt frame. And I really didn't like how busy the quilt would be. My solution was to calm the quilt down by using half the blocks required and substitute tone on tone squares to give the eyes a place to rest. This meant I have enough blocks for two quilts.
The centres and first border on both quilt tops went on my mid arm and were quilted. I left plenty of room around the edges to attach the borders. The borders were to go on using a quilt as you go method. Each quilt would use a different method.
Confession time. You know how seams are supposed to be a scant 1/4"....well a lot of my seams are fat 1/8". Or plain 1/8". I can only hope the quilts will manage a few washings before they fall apart!
Sew, here's the first Block of the Day quilt. No promises on when the second quilt will be finished!
Tuesday, January 2, 2018
A Quilty Start To 2018
New Year's Eve was lovely and quiet. Good friends came over for the afternoon. After a pleasant visit they went on their way and we headed over to my Mom's.
We drove Mom around looking at Christmas lights and then came home. DS joined us for a while and all of us watched some really old black and white Christmas specials while snacking on the appetizers I forgot to serve Christmas Eve. The shows were memories for Mom, and something new for DS. Not sure what he thought of these old shows. Some of them were groaners.
When we took Mom home, DH decided to drive through some different residential areas so Mom could see even more Christmas lights. I love the introduction of projection lights. It makes it that much easier for home owners to light up their homes. The lighting bug is sneaky. One starts with a projection, then add an inflatable snowman or Santa. Next thing you know your whole yard is decorated. Makes it fun for all of us.
After dropping Mom off, we drove past DH's parents to see if the lights were on in their home. Yep, they were. So we parked in their driveway and called them to see if they were up to having some company. They were, so we got our New Year's hug from them as well. All in all, a wonderful way to spend New Year's Eve.
New Year's Day 2018 started with a mystery quilt. Merry Meyhem Mystery Quilts hosted this mystery project. The instructions were great. Several of the ladies from hearts2hands Yahoo group were participating. So there were a few emails from the group during the day about the mystery.
While squaring up a block, my ruler slipped and I trimmed off a tad more than I was supposed to. Okay, a lot more. And it was the fabric that I didn't have any left. Do I trim all the blocks down? Or do I rip out all the blocks, choose a different fabric and re-make all those blocks. Guess what I chose! The 8 1/2" blocks are now 8" blocks. And I was able to get the quilt top finished in one day. Not sure if I'll add a border or two. It's a larger lap size now (instead of the twin size it was supposed to be). A decision for later.
Subscribe to:
Posts (Atom)