Tuesday, February 27, 2018

Quilt Re-Made

Just finished the Star Trek quilt for DS made from salvaged fabric from the house warming gift I gave him back in May.   That quilt had seams that would give way with every washing.   The issue was one fabric that was fraying.

Here's hoping the new quilt stand the test of time.   I used meandering for the quilting since that's what the Free Motion Challenge by Angela Walters had us practicing.  The quilting went very quickly.  I can see why it's a go to for a lot of quilters!


Monday, February 26, 2018

"Ruler" work on mid arm?

I'm so tempted to try ruler work using my Bailey on the quilt frame.  One of these days we will get to a sewing centre so I can purchase the correct ruler foot to use for this type of quilting.

But what if I really don't like that type of quilting.  It's a lot of money to spend on not only the machine foot, but also for the extra thick rulers needed and the lollipop used to support the ruler.  Time to think out of the box before putting out that much cash.

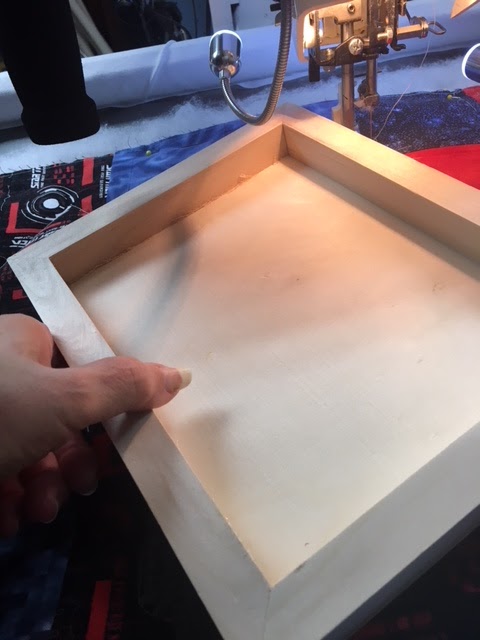
Here's what I found at the dollar store for $3:


It's a light weight "Artist Panel".  Turn it upside down and you have edges that will not go under the quilting foot that is on the sewing machine. 

Here's several photos of how the box fits under the machine next to the foot.  


There is no way the foot will hop over this edge!  So if all you want to do is put some straight edges on your quilt.   Lets say for "Dot to Dot" quilting.  This is a $3 way to go.

The down side is that there are no ruler markings for lining up the seams. 

The upside is there is a lovely edge to hold on to for moving and placing the straight edge. Very easy to guide and keep in place!  And it's so light weight that you do not need a lollipop to support the box.


A bit of fun playing with it:


There is no way I could have free handed straight lines like this.  Can I do complicated designs using this box?  Maybe with more patience than I have.  But for some simple quilting where straight lines would be the right way to go....I'm happy with my experiment.

An update on the dragon fly quilt.  I was so happy with how it was turning out using invisible thread.  Then the thread started breaking, snagging, pieces getting caught up in my machine.  I ended up using black thread to secure the outer edges of each wing and body. 

Once that was done, it was time to secure the tiny bits of fabric that make this quilt special.   Do I change the thread colour for each section?  Contrary to a dear friend's opinion, I do not have that much thread!  So back to the invisible thread.

After a lot of frustration, cleaning the bobbin area constantly, picking up bits and pieces of nylon thread using tweezers....I decided to follow my own advice.  If something is not working...."YouTube it".   Anyone who has experience with invisible thread has already guessed what I had not done.  I forgot to change the upper tension on my sewing machine!  After two and a half dragon flies worth of blue air, things are finally going smoothly.   Hope I didn't just jinx it!


Thursday, February 22, 2018

Machine Applique On The Dragon Fly Wall Hanging

Yesterday I asked the ladies at volunteer sewing how they would stitch down the little pieces of fabric on the dragon fly quilt.   
 
Raw edge, button hole and satin stitch were the main suggestions.  Being lazy, I decided on raw edge.
But this morning even that seemed daunting.   Having to turn that large piece of backing under the sewing needle so often was a pain.  And I'd have to do it twice, once for the coloured fabric, and once again for the black.

Sew I put a hopping foot on my machine, used the zig zag setting, kept the feed dogs up, set the machine on slow stitching so I wouldn't get ahead of myself, and stitched down part of a wing using a free motion movement.
 
I'm using invisible nylon thread on the top, and black in the bobbin.   So far, this has worked like a dream.  A close look at the stitching will show that the stitches are uneven.  But you would have to make sure your glasses are on to see it.  No constantly  turning that huge backing under the needle.   I used the zig zag setting just in case I was too slow to move the fabric, plus the needle moving side to side means  I have to move the fabric under the needle less.
 
I sent the above description in an e-mail to my quilting pals on hearts2hands to see if anyone on the group has ever used this type of stitching for machine appliqué before.  I'm hoping that they will get back to me before I go much further.  If they have tried this and found a problem,  I want to know.  Ripping out tiny stitches is not my favourite pass time!  Here's hoping I  hear from them before I have time to get back to the sewing machine!


Wednesday, February 21, 2018

Free Motion Challenge Week 2

A few of us have joined Angela Walter's Free Motion Challenge.  The first week's video was explaining the project and how to get our practice material ready.

This week we are practicing meandering.  This is definitely something I have never tried.  Not exactly comfortable with it.  So a lot more practice is needed!


Now to practice this on the long arm!

Tuesday, February 20, 2018

The Christmas Present

Back in October, DH treated myself and my Mom.   He drove us to Leduc so we could attend their quilt show.  Lots of lovely quilts,  A great quilter's market.  And best of all, we were able to see a number of quilts that our friend Liliana had on display.  

The attention to detail and all the embellishments Liliana uses, makes her quilts works of art.

It was while walking around the quilters market that DH found my Christmas present.  A lovely dragonfly quilt kit.  Only thing not included in the kit was the batting and backing fabric.   It's lovely.

The two 365 Challenge quilts are finished.   As is my huge roman tile quilt.  So it's time to start a new project.  The dragonfly quilt will be a challenge.  Small pieces, raw edge appliqué.  Lots of time at the iron and sewing machine.  The hardest part.....following the instructions.  For this quilt it's a must, or the quilter will become lost!

There are 20 wings to put together, then stitch.  Here's the first two.  I know they are not evenly spaced.  But I really don't think dragonflies care.  So I won't either.


Saturday, February 17, 2018

Second 365 Block of the Day Quilt is Finished!

The quilt is in the washer as I type.  What a wonderful feeling!   The blocks came from a challenge that started January 1, 2015.  All the blocks were completed be the end of December that year.  The idea was to put all the blocks into one quilt.  But that was way too busy.  So a second centre was pieced and two quilts were made.

The centres of both tops were quilted on my mid arm.  And that's where the projects stopped.  For over a year.   Finally time to experiment.  To one top centre,  the backing was added to, four strips of bat joined to the centre bat, and then the wide border was stitched on.  The borders were pin basted and then free motion quilted using my Janome.   Puckers, pleats and stress galore!   Lots of ripping out stitches and blue air.  Finally that border was quilted.  And the top put aside. 

Then the second top was pulled out to be worked on.  This time the three borders were stitched together for each of the four sides.  Then they were quilted on the long arm.  The backing trimmed 2" beyond the borders.  The borders stitched to the centre.  The backing folded over an inch, then hand stitched closed.  Just a bit of free motion quilting over the space where the top and quilted borders were joined.  Add the binding and the first 365 was completed.  Much easier than the first experiment.  Little puckering and almost no blue air.

Now to finish the earlier experimental top.  Only 2 rows of borders needed to be joined for each side of the quilt.   Instead of quilting it under the domestic machine, these were quilted on the frame.  A bit of backing fabric was wasted, but this was so much easier.   Then add the quilted borders the same as before.  So much easier with the borders having been quilted.  Plus having had some practice with this method in the previous top probably helped.

Using the quilting suspension system made things so much easier.  Both for the free motion under the Janome, and for stitching on the binding. 

Here's the second 365 quilt....


Here's the first 365 for comparison....


Similar, but not identical!   Here's hoping they survive the washing machine and dryer!

Friday, February 9, 2018

Sew what's happening in the sewing room?

What's happening?   The answer is a lot of seam ripping.  Remember this quilt I made for DS's new home?

There was a problem with it.  Every time it was washed, the fabric from the squares would pull out from under the sashing.  Not sure why,  All of the edges were securely stitched.  But it happened.  Loose weave in the fabric perhaps.  Not all the squares had this issue.  Just the light blue.  So that might be the issue.

Wrestling this huge quilt under the sewing machine to make repairs was a pain.  So I bit the bullet and cut the quilt apart.  Dug out the seam ripper and spent hours taking it apart.  All in an effort to save the Star Trek fabric that is no longer available. 

A lot of trimming, starching, pressing and sewing later, here's the new quilt top.


Tomorrow I'll run out to pick up some more batting and I can get this top quilted and give it back to DS. 

The first quilt had been done as a quilt as you go.  This left me with a lot of batting squares and backing.  I'm not one to throw out anything.  So what do I do with the left overs?

The answer came yesterday in an email from Angela Walters.  She's starting a Free Motion Quilt Along.  Quite a few of us from the hearts2hands Yahoo group will be quilting along.  This should be fun. 

Today was spent preparing for the Quilt Along.  My blocks, backing and backing are ready to be put together for the challenge.  Can't wait!