Friday, March 17, 2017

My Summer Disney Backpack/shoulder Bag

It was time to make a new backpack/shoulder bag for myself.  DS had given me more Disney fabric for Christmas.  I still had some of the limited edition fabric left from Last year's Christmas gift.. 

The new bag went together easily.  As usual, there was no pattern.  Just build as you go.  Making sure there are a LOT of pockets.  Two outside zippered pockets.  The inside has one pocket with a zipper, a sunglass pocket, and 3 smaller pockets.


What I didn't do, but should have, was to make sure the pockets on the outside were placed higher up.  Keys in these pockets drop to the bottom, which is partly at the bottom of the bag.  If the bag is full (as mine always is) fishing the keys out is a pain.  One pocket was supposed to be for my cell phone.  That's not going to work.  It would be way to easy to damage the cell phone when it slides down to the bottom of the bag.  Just plunking the bag down on a counter or the floor could have a bad outcome.

The five pockets (including one zippered) on the inside are fine.   Next bag will have two zippered pockets like my first bag does.  Although this bag does have a special pocket for sunglasses.  No more searching for those.  They are always where I can find them easily.

This is also a case of measure twice and cut once.  The first bag is a perfect size.  Easy to get things in and out of.  I thought that I was making this bag the same size.  It's not.  About 2" narrower.  It's amazing how much difference 2" makes.   But it does carry what I need (and probably more) so I'll use it over the summer. 

My next bag to be made this fall will feature the Disney Evil Villains.  Possibly in purple.


Saturday, March 11, 2017

Another quilt finished!

Another quilt is off the frame, bound and in the wash.  And it's about time.  The top was finished almost a year ago. 

This Trail Mix quilt was sewn as a "Leaders & Enders" project.  Thread tails can get pulled into the bobbin area by the needle.  Having a scrap of fabric under the needle before sewing what you are "really" working on keeps those tails were they need to be.  Not in the bobbin area!

Linda from the hearts2hands yahoo group introduced the group to the Trail Mix pattern.  She makes quite a few of these quilts from her scraps as she is sewing her quilt tops.  Sew two pieces of fabric together before or after sewing what your current project is and before you know it you have a quilt top finished.  It's two for one.  And no using the same sad piece of fabric as a leader that ends up in the garbage.

Not sure who is going to get this quilt.  I really enjoyed making it.  Even though I'm pretty sure at least two blocks are in the wrong place.  Oh well.  That makes it different from all the other Trail Mix quilts out there.


Now to take my Bailey apart to see why it is sounding like a John Deere tractor.  A post asking for help from the Bailey user group seems to be in order.  No more frame quilting until that issue is sorted out!


Tuesday, March 7, 2017

Trial and a lot of error

I decided to try making a queen size quilt using a "Quilt as you go" method.  What was I thinking?  Of course 20/20 hindsight tells me that making a small lap quilt or baby quilt first would have made more sense.  Nope, I jump in and make a queen size one.  Live and learn.

There are a lot of things I'd do differently.  In particular, pay attention to details!
Marking the stitching line on both back pieces. Pin on those lines so fabric doesn't shift.  Making the backing larger than I did so I could trim after the quilting was done.  Lots of things are apparent now.  But the quilt is done.

Here's the process....hope it's not too confusing:

First make the number of blocks required.  I used 80 9 1/2" focus fabric and 4 patches in all.  Cut the bat to the same size as the top blocks. One per block.

Of course I had a helper.  This project did use up a lot of the left overs I had saved from other projects.  In fact cutting these 80 squares freed up a huge plastic storage box.


The top block as mentioned above is 9 1/2", as is the bat.  The backing used is 11 1/2".  I really should have cut at least 12 1/2" or 13" squares and then trimmed once each block was quilted.
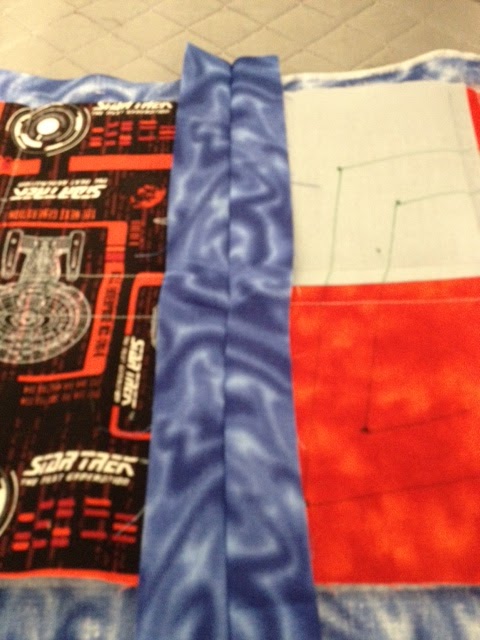
Here are blocks joined, backings together.  The seam will be right along the edge of the batting and block leaving 1" to be folded over as sashing.
The two blocks are sewn together, laid flat and ready to have the backing pressed open over the blocks.
The 1" backing fabric from each block is now pressed open.
Next step is to fold each of the two edges to the centre to hide the raw edges.  Then press.  Pin and stitch down.
Continue joining the blocks by sewing backs together, opening, pressing to centre and stitching down until a full row is made.  Of course a feline inspector is a must.
Join the rows the same way the blocks were joined.
Binding was done by folding the backing up to the bag and blocks, fold over again and stitch down - self binding method.

Clear as mud?  Sorry.  I'm hoping that a picture is worth a thousand words.  Unfortunately it should be a good photo not the ones I take.....